| Tips and tricks
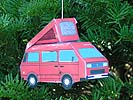
in building the Westfalia Xmas ornament. |
Here are my 2 completed
Westies. It is a marvel how nice and realistic they look. Here's some
suggestions.
- I printed 2 sheets, one to refer to where the fold lines are while I
worked on the other.
- My hands are shaky and I am not good with scissors. I used a
straight edge ruler and an exactor hobby knife to cut out the pattern.
Slow going, but accurate.
- If you use the knife method, do it with a cardboard backing so as to
not cut up the table. I used the back of a notepad.
- Once the pattern is cut, pre-fold where you are supposed to. Before
gluing, do a dry fit to make sure you have it right.
- Have some scotch tape handy if you make a mistake. I needed to mend
one when I didn't cut right.
- I used Elmer's glue but I think a paper glue (muselage) might work
better.
- Go slow and hold the things together while the glue sets up.
- Try and resist going vrooom when playing with your new Westy.
Enjoy!
|
 |
 |
- If possible, print on Hi-Gloss
photo paper,
- I used double backed Scotch Tape instead of Elmers Glue. It grabs
and holds very well and you don't have hold the tabs while the
glue sets. Also, it's easier to reposition the tabs for any
re-alignment.
- Another tip; attach one side of the underbody to the body (after
tape has been applied to all tabs on both body and underbody).
Assemble only the front and back to the side to which the
underbody is attached, then attach the other side and swing the
underbody into position. This sequence allows you to squeeze
the tabs together with your fingers for a more secure bond.
- The double backed tape makes the whole job a snap. Be sure all
tabs are folded and creased for a sharp bend. I scored the fold
lines with a ball point pen before bending and applying tape.
|

